
How to Make a Kontakt Library in 5 Steps
SKILL LEVEL: BEGINNER
Every Kontakt Library that I've ever made I created sitting on my bed just me and my laptop. My goal is to teach you to do the same in a few easy steps.
PROGRAMS NEEDED
A Digital Audio Workstation (DAW) of your choice
Full Version of Kontakt
Windows and Mac Compatible
HERE'S A SECRET
Creating Kontakt libraries can seem like a huge undertaking because we are accustom to seeing amazingly executed, meticulously recorded sample libraries that are for sale at big music retailers. But at a practical level, Kontakt libraries can still serve a great purpose for us composers:
We can compile our favorite sounds and samples into categorized instruments
Easily use a custom sound sample repeatedly in multiple projects and sessions by simply saving and booting up a Kontakt Instrument
Borrowing a rare instrument? Create a sample of it so you can continue to include it in future productions even after you return it
Playability: Instead of copying and dragging with a mouse, you can play your samples in complex rhythms on your midi keyboard or launchpad controller with ease
Whatever your unique purpose might be, here are the steps you will need to take to create your library.
IF YOU HAVE PRE-RECORDED SAMPLES, SKIP TO STEP 5—OTHERWISE, LET'S START FROM SCRATCH BELOW!
STEP 1: COMPILE YOUR FAVORITE "TOYS" EHRM, I MEAN "INSTRUMENTS"
If you dig through the generic stock sound libraries included with your DAW or even Kontakt for that matter, you are bound to find your standard shaker, tambourine, hand drum; you name it. But have you ever noticed how bland and unrealistic they sound? Gather some instruments around your apartment, maybe borrow some from a friend or local university (with permission of course) and let's make some REAL sounding instrument samples!
STEP 2: HIT RECORD—KEEP IT SIMPLE
Again, this article is focusing on making Kontakt instruments easily from your home. If you want a more in-depth how-to on recording advanced single instrument Kontakt libraries, check out my article titled Create Your Own Kontakt Libraries where I document how I made my Crotale Sample Library. I even give it away as a free download!
The idea here is to record the instrument the way you would actually record it in a session, so use what you have—don't be shy, use multiple mics if you need! If we were going for a basic pristine sound, we would just use the stock libraries I mentioned earlier! The idea here is to capture some character in the recording to make your music more unique, so go ahead, use that SM57 or that AKG414 that's lying around, they will both get the job done. Just trust your ears. If you don't have a microphone yet, I've included links to some of my favorites!
STEP 3: EDIT OUT THE JUNK
When you record, just let the tape run (as they say). In the editing phase, pick out your favorite takes, and get rid of the ones that were not so great. This might take some time, but this is the bulk of the work—trust me. Edit each sample into individual regions or clips. It is extremely important to have each region begin exactly where the sound begins in the sample. If there are a few milliseconds of silence in the clip before the sound starts, there will be a noticeable and annoying lag every time the sample is triggered. For the most responsive samples, take careful care to edit them accurately.
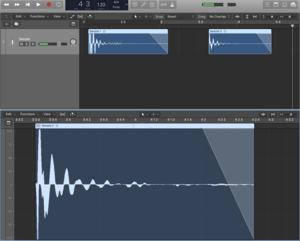
Fig. 1 - Make sure you start the sample right when the sound begins. Otherwise, there will be a bit of lag when the sample is triggered!
I always like to put a gentle fade at the end of each clip because as you can see in Fig. 1, there is a tad bit of ambient room noise when I recorded this sample that lingers even when the sound is over (probably due to an airplane or car passing by). This is okay and usually won't be heard in the final song arrangement. Just fade it out, and life is good.
TIP: Instead of deleting bad takes, drag them all to a new track that is muted or disabled. That way you can store your bad takes safely, without ever hitting that delete key. With a lot of editing going on, it would suck to have deleted something that you ultimately were wanting to keep!
STEP 4: THROW A LIMITER ON IT
The next step is processing the raw audio to make it sound spectacular! We can really go in depth here, but if I suddenly took this article into mixing territory, it would go on for ages. Besides, you might want to mix these samples differently in each project you use them in! So for now, we are going to keep it simple and use a limiter as the only audio processing.

Fig. 2 - The FabFilter Pro L2 is one of my favorite limiters! Be sure just to add gain so that you are just approaching 0db but not actually hitting it!
A limiter keeps audio from peaking above a threshold (usually 0db) while giving you the ability to add gain to the audio. This is exactly what we are going to do to our sample library. In your DAW, bring up a limiter plugin and place it on the track with your samples. Increase the gain on the limiter during playback and watch the meters. Add a sufficient amount of gain so that the audio is loud and strong, but not so much that it crosses above 0db. We don't actually want to limit any of the audio, we are just using this limiter as a tool to increase our sample volume, as well as a safeguard from clipping/distortion when we export.
Speaking of exporting, that is the last thing we will do in our DAW. In order to export our tracks with our limiter affecting the audio, we are going to "Bounce" our samples to disk. In different DAWs such as Logic and Ableton, there are options to "export with effects" but in my copy of Pro Tools, I don't have that kind of luxury. So Bouncing instead of exporting is essential to get that limiter effect written into the audio during export. Save these file to a folder and keep it nearby.
STEP 5: IMPORT INTO KONTAKT 5
Once the samples are exported from your DAW, get Kontakt ready to receive the files. The process takes a few clicks, but it's very simple:
Open Kontakt 5 (you need the full version to do this)
Create a new Kontakt instrument - Click “Files,” then “New instrument.” (Fig. 3)
Once the instrument is created, named it and click on the wrench icon in the top left-hand corner. This reveals the Instrument Edit Mode for Kontakt. (Fig. 4)
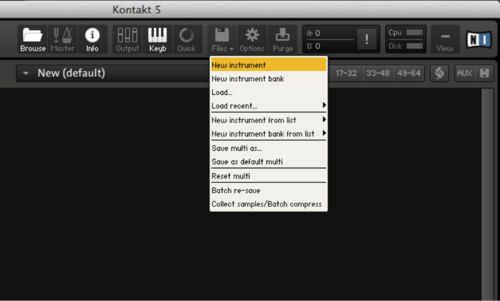
Fig. 3 - Kontakt 5 menu. Creating a new Kontakt instrument.

Fig. 4 - This is what you should see after you click the wrench icon on the top left of a new instrument.
STEP 5 CONT.
In the instrument edit mode, there is one tool in particular we want to use to map our samples to the MIDI keyboard: the Mapping Editor. Locate the Mapping Editor right under the instrument name and info display. Once you click, the Mapping Editor window will open within Kontakt and a grid aligned to a standard musical keyboard will appear (Fig. 5).

Fig. 5
This next part is really easy! Open the folder where you saved your exported samples and drag them onto the grid. Align each sample with the key on your MIDI keyboard you want to trigger the sample. Once you drag a sample into the grid, you will see a blue rectangle illuminate the column (Fig. 5).
At this point, the samples should be playing when triggered by information.
SAVE YOUR LIBRARY
Give your library a descriptive name and save it to a folder where you can begin your collection of awesome home-made Kontakt Libraries.